How to Thaw Frozen Pipes
Call Us TodayWe recommend first identifying which pipes are frozen by checking for little to no water flow from faucets. Once located, you’ll want to open the faucet connected to the frozen pipe before applying any heat. This relieves pressure in the system and allows water to flow as the ice blockage begins to melt.
If you can’t access the frozen section of pipe, don’t panic. You can still thaw pipes by heating the area around them. For pipes behind walls, try increasing the home’s temperature and directing warm air toward the affected area. For metal pipes with accessible portions, applying heat tape to the exposed sections can help conduct warmth to the frozen areas.
Understanding and Preventing Frozen Pipes
Identifying Susceptible Pipes
We recommend checking your home for exposed pipes in these areas before winter arrives. Previous freeze patterns can provide valuable clues – inspect areas where pipes have frozen before. Water pipes running through crawl spaces deserve extra scrutiny, as these areas rarely receive adequate heating.
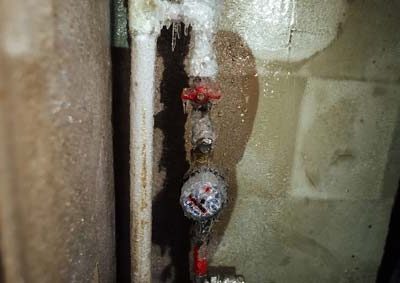
Signs of potentially vulnerable pipes include condensation, frost on exterior surfaces, or noticeable temperature drops when touching the pipe.
Insulation Strategies
For copper pipes in extreme cold areas, consider heat tape or heating cables that can be wrapped around pipes and plugged into electrical outlets. This active heating system maintains pipe temperatures above freezing point.
Several insulation materials work effectively:
- Fiberglass pipe wrap – Good for larger areas
- Foam pipe sleeves – Easy DIY installation
- Rubber pipe insulation – Flexible for tight spaces
Don’t forget to insulate pipe fittings and valves using specialized products or tape. Seal any gaps in walls or floors around pipes with caulk to prevent cold air infiltration.
Proactive Measures
When temperatures plummet, allow faucets connected to vulnerable pipes to drip slowly. The movement of water helps prevent freezing, even at a trickle. Opening cabinet doors beneath kitchen and bathroom sinks allows warmer air to circulate around plumbing.
Consider these additional home improvement steps:
- Add extra insulation to attics, basements and crawl spaces
- Seal drafts around windows and doors
- Install weather stripping to reduce cold air entry
- Use smart thermostats to monitor temperature in problem areas
For extended absences during winter, never set your thermostat below 55°F (13°C).
Techniques for Thawing Frozen Pipes
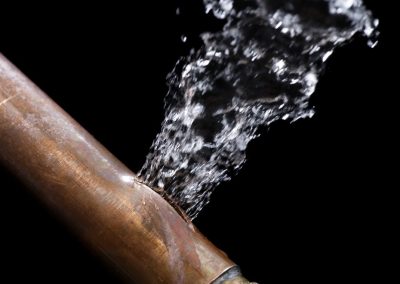
When dealing with frozen pipes, it’s crucial to act quickly using appropriate thawing methods to prevent pipe bursts and water damage. Several effective techniques can safely restore water flow depending on the location and accessibility of the frozen section.
Gradual Thawing Methods
For pipes in enclosed spaces, increase the temperature in your home, particularly in areas where pipes are located. Space heaters, especially infrared types, can effectively warm the ambient air around pipes.
If pipes are located behind walls, directing warm air into the wall cavity through an access point can help. Remember that patience is key with this method.
For frozen pipes along exterior walls, removing insulation temporarily might help ambient heat reach the pipe more effectively. Always replace insulation once the crisis has passed.
Applying Direct Heat
Hot towels provide another effective solution. Soak towels in hot water, wring them out, and wrap them around the frozen section. Replace them frequently as they cool.
Heating pads can be wrapped around the pipe for consistent warmth. Ensure the heating pad remains dry and check it regularly to prevent overheating.
Heat lamps positioned near (but not touching) the pipe can provide steady warmth. Be careful with placement to avoid fire hazards or damage to surrounding materials.
For outdoor pipes, you might use a propane torch, but only with extreme caution and never on PVC or near flammable materials.
Using Electrical Thawing Devices
Heat tape or heating cables can be applied directly to pipes before freezing occurs as a preventative measure. They can also help during thawing by providing consistent, controlled heat.
Some plumbers use specialized electrical clamps that attach to either side of a frozen section. These pass current through the pipe, generating heat to thaw ice from within.
For severe freezes, professional plumbers might use a pipe thawing machine with a compressor component that forces warm air through the system. This equipment should only be handled by professionals.
Safety Considerations
Never use open flames like blowtorches directly on pipes. The intense heat can damage pipes, create fire hazards, and potentially cause pipes to burst.
Always locate your circuit breaker box before starting, especially when using electrical appliances near water sources. Keep all electrical devices away from standing water.
Protect yourself with gloves when handling hot materials or equipment. Watch for signs of pipe damage during thawing, as leaks may appear once ice melts.
Monitor the thawing process constantly. Never leave heating devices unattended, as they present fire risks. If you cannot thaw pipes safely or if you discover damage, call a professional plumber immediately.

Frequently Asked Questions
Tackling frozen pipes requires specific approaches based on where and how they’re frozen. Proper techniques and safety measures are essential to prevent damage to your plumbing system while effectively addressing the issue.
How can I safely thaw frozen pipes within a wall?
You can use an infrared lamp or space heater directed at the wall section, keeping a safe distance to prevent fire hazards. Never use open flames or high-temperature heat guns directly on walls.
For stubborn freezes, consider cutting a small access hole in the wall, but this should be a last resort. In many cases, calling a professional plumber is the safest option for pipes frozen inside walls.
What is the most efficient method to thaw underground pipes?
For completely buried pipes, professional plumbers use specialized pipe-thawing equipment that sends electrical current through the pipe to generate heat. This method is effective but should only be performed by qualified professionals.
We recommend contacting your utility company or a licensed plumber with experience in underground pipe thawing. They have the proper tools and expertise to address this safely.
How much time does it typically take for frozen pipes to thaw on their own?
For more severe freezes or during continued cold weather, pipes may remain frozen for days. Indoor pipes in heated spaces typically thaw faster than those in unheated areas or exterior walls.
Rather than waiting for natural thawing, which risks pipe damage, we recommend taking active but safe measures to speed up the process. The longer pipes remain frozen, the greater the risk of bursting.
What are the signs that indicate a pipe has frozen, and how can I locate it?
Visible frost on exposed pipes, bulging sections, or pipes that feel extremely cold to the touch are clear indicators. Unusual odors from drains might also suggest a frozen pipe is blocking proper drainage.
To locate frozen sections, feel along accessible pipes for areas that are unusually cold or show condensation. Pipes in exterior walls, unheated spaces, and areas with previous freezing issues are most vulnerable.
What precautions should I take to prevent damaging my pipes while thawing them?
Open the faucet connected to the frozen pipe to relieve pressure and allow water to flow as the ice melts. Start thawing from the faucet end and work toward the blockage to prevent pressure buildup.
Never use open flames, blowtorches, or high-temperature heat guns directly on pipes. These can damage pipes, create fire hazards, or even cause pipes to explode. Use gentle, consistent heat sources like hair dryers, heat lamps, or specialized pipe-thawing equipment.
What steps should I follow to thaw frozen pipes inside a mobile home or trailer?
Use a space heater in the affected room or direct a hair dryer at exposed pipes. For pipes under the mobile home, using heat tape or a portable heater can be effective, but take care to avoid fire hazards.
We recommend keeping cabinet doors open and maintaining a consistent interior temperature. Many mobile homes benefit from adding extra insulation around pipes and sealing areas where cold air might enter from underneath.
Learn More About Our
Related Water Articles

Water Damage
We can help you with water damage cleanup and repair solutions for your home or business. Learn More
Common Causes of Water Damage
Learn more about the most common causes of a water damage loss claim... Learn More
Water Classes and Categories
Learn more about the different types of water loss classes and categories...Learn More
Stagnant Water Dangers
Learn more about stagnant water and the potential dangers it poses..Learn More